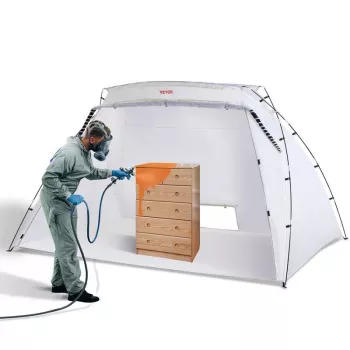
A spray shelter creates a controlled, portable workspace for painting, staining, or sealing furniture and craft pieces while helping limit overspray, dust, and mess. It’s a practical option for garages, patios, driveways, and small workshops—especially when a full spray booth isn’t realistic.
What a spray shelter does (and what it doesn’t)
A spray shelter is best thought of as a “cleaner zone” for finishing work: it helps keep your project protected and your space easier to manage.
- Provides a semi-enclosed area that helps contain overspray and keeps floating debris off wet finishes.
- Improves consistency by reducing wind impact during outdoor spraying.
- Helps protect surrounding floors, walls, and nearby items from paint mist.
- Not a substitute for proper ventilation—airflow planning and safe spray practices still matter.
- Not designed to eliminate fumes; respirators and product-label safety steps remain essential.
For background on indoor air concerns like VOCs, see the U.S. EPA overview of VOCs.
When a spray shelter is the right tool
- Refinishing small to medium furniture pieces: nightstands, chair frames, drawer fronts, cabinet doors.
- Craft projects that benefit from cleaner edges: signs, frames, décor panels, small builds.
- Quick jobs using rattle cans, HVLP, airbrush, or small paint sprayers—where overspray control matters.
- Temporary workspaces where a permanent booth isn’t possible (rental homes, shared garages, seasonal projects).
- Footprint and internal clearance: enough room to rotate the piece and keep the spray pattern off the walls.
- Openings and access: front entry size for moving furniture in/out without scraping wet edges.
- Wall and floor coverage: surfaces that help catch overspray and simplify cleanup.
- Stability: structure that stays put with airflow from fans and light wind outdoors.
- Portability: folds down for storage; manageable weight for moving between garage and patio.
- Visibility: lighter interior surfaces can make it easier to see coverage and missed spots.
Size planning: match the shelter to the project
Size is where most finishing setups either feel effortless or frustrating. A shelter that’s technically “big enough” can still feel cramped once you add a spray pattern, arm movement, and drying space.
- Measure the largest project dimension (height/width/length) and add working clearance on all sides.
- Plan for tool movement: spray gun distance plus arm movement typically needs more space than expected.
- Account for drying: ensure the piece can sit undisturbed while tacky without brushing walls.
- If spraying multiple parts (doors, drawers), consider space for a small rack or stands inside.
Quick sizing guide for common furniture and craft projects
| Project type |
Typical dimensions |
Recommended clearance inside shelter |
Notes |
| Drawer fronts / small panels |
Up to ~24 in wide |
6–10 in around edges |
Use a turntable or raised blocks to reduce edge pooling. |
| Chair frames / small tables |
Up to ~30–36 in tall |
10–16 in around edges |
Extra clearance helps reach spindles and underside angles. |
| Nightstands / cabinet doors batch |
Up to ~24 x 18 x 28 in |
12–18 in around edges |
Leave room for a drying rack or spacing between parts. |
| Larger furniture sections |
Varies |
18+ in around edges |
If you can’t rotate the piece safely, consider spraying in stages. |
Setup checklist for cleaner results
- Place on a level surface; use a drop cloth under the shelter if overspray on the floor is a concern.
- Use stands/blocks to lift the project so edges are reachable and paint doesn’t glue the piece to the surface.
- Add bright, indirect lighting so wet coverage is visible from multiple angles.
- Control airflow: avoid strong cross-breezes; if using a fan, position it to move air safely without blasting dust onto the finish.
- Keep a “clean zone” nearby for mixing, nozzle changes, and setting tools down without contamination.
Technique tips for furniture and craft finishes
- Test spray pattern on cardboard before spraying the piece; adjust distance and trigger control.
- Use multiple light coats rather than a heavy coat to reduce runs and orange peel.
- Maintain consistent overlap (often about 50%) and keep the nozzle perpendicular to the surface.
- For spindles and detailed trim: spray from several angles with lighter passes to avoid buildup.
- Respect recoat windows and cure times on the can or technical data sheet—handling too soon leaves fingerprints and dull spots.
Overspray control and cleanup
- Let overspray settle before moving the shelter; disturbing it too soon can redeposit dust on wet surfaces.
- Wipe or replace catch surfaces as recommended to prevent buildup that can flake onto future projects.
- Store the shelter dry to avoid trapped moisture and odors; fold carefully so coated surfaces don’t stick together.
- Keep solvents and cleaners in sealed containers and dispose of rags safely (some finishes can self-heat during curing).
Safety essentials to keep in place
For respirator program requirements and best practices, reference OSHA’s Respiratory Protection standard (29 CFR 1910.134).
Shop: Spray Shelter for Furniture & Craft Projects
Helpful add-on for a tidier workspace
Workspace storage: Elegant European Black Acrylic Tissue Box – Luxury Home Decor Storage
FAQ
Can a spray shelter be used indoors?
Yes, but it shouldn’t be treated as a fume-control system. Maintain fresh-air exchange, keep all ignition sources away, and wear the respirator specified by the coating label.
Does a spray shelter prevent dust from landing on wet paint?
It reduces exposure compared to open-air spraying, but it can’t eliminate dust entirely. Better results come from cleaning the area, managing airflow, and minimizing movement while the finish is tacky.
What’s the best way to avoid runs when spraying furniture inside a shelter?
Use multiple light coats, keep consistent distance and overlap, and allow proper flash time between coats. Raising the piece on blocks or stands also helps you reach edges without flooding them.
Recommended for you











Leave a comment